An 8 bit particle simulation
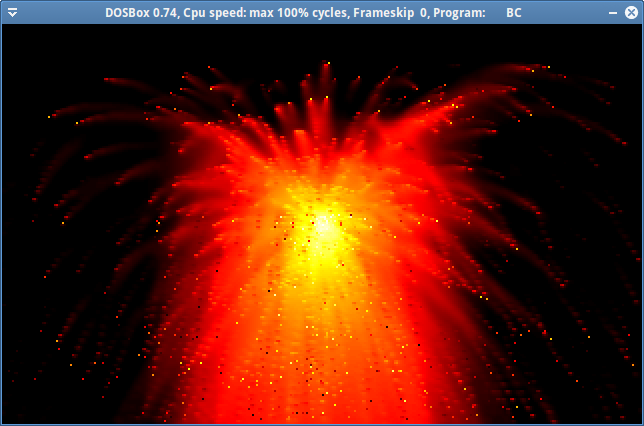
10 Jan 2015Time to do another write up on an old demo effect that’s always a crowd pleaser. A particle system. In today’s post, this particle system will act like a geyser of pixels acting under gravity that will appear to burn as the tumble down the screen.
We’re working in old school mode 13 (320x200x256) today in DOS.

Trust me. It looks a lot more impressive when it’s animating!
The envrionment
First of all, we’ll start off by defining some global, environment level constants that will control the simulation for us. It’s always good to define this information as constants as it allows for quick tweaking.
#define PARTICLE_COUNT		1000
#define GRAVITY				0.1f
PARTICLE_COUNT will control the number of particles in total for our simulation and GRAVITY controls the amount of pull on the y-axis that the particles will experience whilst they’re in the simulation.
Next, we need to define the particles themselves.
What’s a particle
The data that makes up a particle is a position (x and y), a velocity (vx and vy), life and decay. The velocity variables (vx and vy) impact the position variables (x and y) after each frame of animation. The GRAVITY constant impatcs the y velocity (vy) in such a way that all particles are biased towards the bottom of the screen over time. The decay variable is used to determine how much life is lost from the particle per frame and finally life itself determines how far through the colour scale that the particle should be drawn.
The life variable is tightly related to the way that we setup our indexed palette also. With life starting at 255.0f; making its way to 0.0f we interpolate its value over a 255..0 range so that it can directly correspond to a colour index. The way the colour index is setup, a particle at its strongest life will be white; it’ll move its way through yellow, orange to red finally ending at black (which will be 0).
From these variables (per particle) we can animate its rather short-life on screen. We can easily wrap all of this information up into a structure:
typedef struct _particle {
	float x, y;
	float vx, vy;
	float life, decay;
} particle;
Animating the particles
There are some default actions that we need to define for these particles though. We really need a way to initialise, render and update them in order to animate their characteristics appropriately.
All of the functions that are written for this particle system operate on an array index. The array itself is globally defined.
Initialisation is just setting some starting values for the particle. You can play with these values to taste, but I personally like a random velocity (in any direction):
void init_particle(int idx) {
	particle *p = &particles[idx];

	p->x = 160.0f; p->y = 100.0f;
	p->vx = (-200 + random(400)) / 70.0f;
	p->vy = (-200 + random(400)) / 50.0f;

	p->life = 255.0f;
	p->decay = 0.95f + (random(5) / 100.0f);
}
As I said above, we’re in mode 13. We’ve got 320x200 pixels to work with, so I start all particles off in the centre of the screen. Velocities are set using the standard random number generator inside of libc. life starts at the top of the spectrum and decay is defined very, very close to 1.0f.
Rendering a particle is dead-simple. We just draw a pixel on the screen.
void draw_particle(int idx) {
	particle *p = &particles[idx];

	if (p->x >= 0.0f && p->x < 320.0f &&
		p->y >= 0.0f && p->y < 200.0f &&
		p->life > 0.0f) {
		unsigned char col = (unsigned char)p->life;
		set_pixel((int)p->x, (int)p->y, col, vga);
	}
}
Finally, updating a particle is just a little bit of very simple artithmetic:
void update_particle(int idx) {
	particle *p = &particles[idx];

	p->x += p->vx;
	p->y += p->vy;

	p->vy += GRAVITY;
	p->vx *= 0.999f;
	p->life *= p->decay;

	if (p->x < 0.0f || p->x > 319.0f ||
		p->y < 0.0f || p->y > 199.0f ||
		p->life < 0.0f) {
		init_particle(idx);
	}

}
The position is augmented by the velocity, the y velocity by the gravity and life by the decay. vx is also adjusted by multiplication of a constant very close to 1.0f. This is just to dampen the particle’s spread on the x-axis.
Finally, if a particle has move outside of its renderable environment or it’s dead we just re-initialize it.
The secret sauce
If this is where we left the simulation, it’d look pretty sucky. Not only would we just have a fountain of pixels, but nothing would really appear to animate as your screen filled up with pixelated arcs following the colour palette spectrum that’d been setup.
We average the colour of the pixels on screen to give the particle system a glow (or bloom). This also works well with not clearing the screen before every re-draw as we want the trails of the particles left around so that they’ll appear to burn up.
Direct access to video memory through assembly language allows us to get this done in a nice, tight loop:
void bloom() {

	asm {
		mov		ax,	0x0a000
		mov		es, ax

		mov		di, 320
		mov		cx, 63680
	}
	next_pixel:
	asm {
		xor		ax, ax
		mov		al, [es:di]

		add		al, [es:di-1]
		adc		ah, 0

		add		al, [es:di+1]
		adc		ah, 0

		add		al, [es:di-320]
		adc		ah, 0

		shr		ax, 2

		mov		[es:di], al

		inc		di
		dec		cx
		jnz		next_pixel

	}

}
The full source for this demo can be found here. It’s compilable with any real-mode compiler for DOS.