Previously, we’ve explored WASM in rust as well as some more advanced
concepts with Pixel Buffer Rendering again from
Rust. In today’s article, we’ll go through WebAssembly from a more fundamental perspective.
WebAssembly (Wasm) is a powerful technology that enables high-performance execution in web browsers and beyond. If
you’re just getting started, this guide will walk you through writing a simple WebAssembly program from scratch,
running it in a browser using JavaScript.
What is WebAssembly?
WebAssembly is a low-level binary instruction format that runs at near-native speed. It provides a sandboxed execution
environment, making it secure and highly portable. While it was initially designed for the web, Wasm is now expanding
into cloud computing, serverless, and embedded systems.
Unlike JavaScript, Wasm allows near-native performance, making it ideal for gaming, video processing, and even AI in
the browser.
First program
Before we start, we need to make sure all of the tools are available on your system. Make sure you have
wabt installed on your system:
sudo pacman -S wabt
WAT
We’ll start by writing a WebAssembly module using the WebAssembly Text Format (WAT).
Create a file called add.wat with the following code:
This module defines a function $add that takes two 32-bit integers (i32) as parameters and returns their sum.
local.get retrieves the parameters.
i32.add performs the addition.
The function is exported as "add", making it accessible from JavaScript
wat2wasm
To convert our add.wat file into a .wasm binary, we’ll use a tool called wat2wasm from the
WebAssembly Binary Toolkit (wabt) that we installed earlier:
wat2wasm add.wat -o add.wasm
This produces a binary add.wasm file, ready for execution.
Running WebAssembly from Javascript
Now, let’s create a JavaScript file (index.js) to load and execute our Wasm module:
asyncfunctionrunWasm(){// Fetch and compile the Wasm moduleconstresponse=awaitfetch("add.wasm");constbuffer=awaitresponse.arrayBuffer();constwasmModule=awaitWebAssembly.instantiate(buffer);// Get the exported add functionconstadd=wasmModule.instance.exports.add;// Call the functionconsole.log("5 + 7 = ",add(5,7));}runWasm();
We can execute this javascript by referencing it from a html file, and running this in a browser.
In the world of computational geometry, Delaunay triangulation stands out as one of the most versatile and powerful
algorithms. Its ability to transform a scattered set of points into a structured mesh of triangles has applications
ranging from terrain modeling to wireless network optimization.
This blog explores the concept of Delaunay triangulation, the algorithms that implement it, and its real-world
applications.
What is Delaunay Triangulation?
Delaunay triangulation is a method for connecting a set of points in a plane (or higher dimensions) to form a network
of triangles. The primary property of this triangulation is that no point lies inside the circumcircle of any triangle.
This ensures the triangulation is “optimal” in the sense that it avoids skinny triangles and maximizes the smallest
angles in the mesh.
A key relationship is its duality with the Voronoi diagram: Delaunay
triangulation and Voronoi diagrams together provide complementary ways to describe the spatial relationships between
points.
Why is Delaunay Triangulation Important?
The importance of Delaunay triangulation stems from its geometric and computational properties:
Optimal Mesh Quality: By avoiding narrow angles, it produces meshes suitable for simulations, interpolation, and rendering.
Simplicity and Efficiency: It reduces computational overhead by connecting points with minimal redundant edges.
Wide Applicability: From geographic information systems (GIS) to computer graphics and engineering, Delaunay triangulation plays a foundational role.
Real-World Applications
Geographic Information Systems (GIS)
Terrain Modeling: Delaunay triangulation is used to create Triangulated Irregular Networks (TINs), which model landscapes by connecting elevation points into a mesh.
Watershed Analysis: Helps analyze water flow and drainage patterns.
Computer Graphics
Mesh Generation: Triangles are the fundamental building blocks for 3D modeling and rendering.
Collision Detection: Used in simulations to detect interactions between objects.
Telecommunications
Wireless Network Optimization: Helps optimize the placement of cell towers and the connections between them.
Voronoi-based Coverage Analysis: Delaunay edges represent backhaul connections between towers.
Robotics and Pathfinding
Motion Planning: Robots use triangulated graphs to navigate efficiently while avoiding obstacles.
Terrain Navigation: Triangulation simplifies understanding of the environment for autonomous vehicles.
Engineering and Simulation
Finite Element Analysis (FEA): Generates triangular meshes for simulating physical systems, such as stress distribution in materials.
Fluid Dynamics: Simulates the flow of fluids over surfaces.
Environmental Science
Flood Modeling: Simulates how water flows across landscapes.
Resource Management: Models the distribution of natural resources like water or minerals.
A Practical Example
To illustrate the concept, let’s consider a set of points representing small towns scattered across a region. Using
Delaunay triangulation:
The towns (points) are connected with lines (edges) to form a network.
These edges represent potential road connections, ensuring the shortest and most efficient routes between towns.
By avoiding sharp angles, this network is both practical and cost-effective for infrastructure planning.
Here’s a Python script that demonstrates this idea:
importnumpyasnpimportmatplotlib.pyplotaspltfromscipy.spatialimportDelaunay# Generate random points in 2D space
np.random.seed(42)# For reproducibility
points=np.random.rand(20,2)# 20 points in 2D
# Perform Delaunay triangulation
tri=Delaunay(points)# Plot the points and the triangulation
plt.figure(figsize=(8,6))plt.triplot(points[:,0],points[:,1],tri.simplices,color='blue',linewidth=0.8)plt.scatter(points[:,0],points[:,1],color='red',s=50,label='Points')plt.title("Delaunay Triangulation Example")plt.xlabel("X-axis")plt.ylabel("Y-axis")plt.legend()plt.grid(True)plt.show()
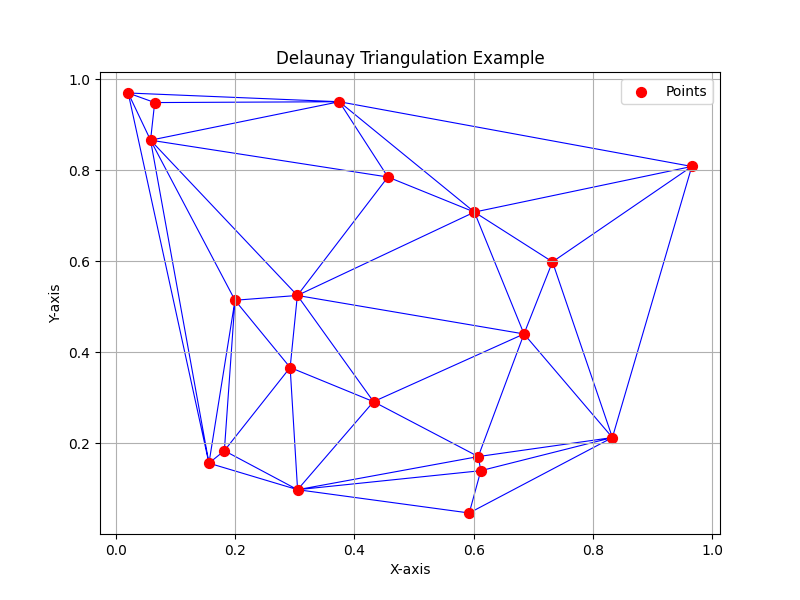
The following is the output from this program.
Note how the paths between the points are the most optimal for connecting the towns efficiently. The triangulation
avoids unnecessary overlaps or excessively sharp angles, ensuring practicality and simplicity in the network design.
Limitations and Challenges
While Delaunay triangulation is powerful, it has its challenges:
Degenerate Cases: Points that are collinear or on the same circle can cause issues.
Scalability: Large datasets may require optimized algorithms to compute triangulations efficiently.
Extensions to Higher Dimensions: In 3D or higher, the algorithm becomes more complex and computationally expensive.
Conclusion
Delaunay triangulation is a cornerstone of computational geometry, offering an elegant way to structure and connect
scattered points. Its versatility makes it applicable across diverse domains, from GIS to robotics and environmental
science. Whether you’re modeling terrains, optimizing networks, or simulating physical systems, Delaunay triangulation
is an indispensable tool for solving real-world problems.
Rust is celebrated for its emphasis on safety and performance, largely thanks to its robust compile-time checks.
However, there are situations where you need to bypass these checks to perform low-level operations—this is where
Rust’s unsafe keyword comes in. While unsafe opens the door to powerful features, it also comes with significant
risks.
The solution?
Encapsulating unsafe code in safe abstractions.
This post explores what that means, why it’s important, and how to do it effectively.
Understanding unsafe in Rust
Rust enforces strict memory safety guarantees by default. However, some operations are inherently unsafe and require
explicit acknowledgment from the programmer. These include:
Raw pointer manipulation: Directly accessing memory without bounds or validity checks.
Foreign Function Interface (FFI): Interacting with non-Rust code (e.g., calling C functions).
Manual memory management: Allocating and freeing memory without Rust’s usual safeguards.
Concurrency primitives: Implementing data structures that require custom synchronization logic.
When you write unsafe code, you’re essentially telling the compiler, “I know what I’m doing; trust me.”
While this is sometimes necessary, it’s critical to minimize the potential for misuse by others.
Why Wrap Unsafe Code in Safe Abstractions?
Using unsafe is a trade-off. It gives you access to low-level features and optimizations but requires you to
manually uphold the invariants that Rust would otherwise enforce. Safe abstractions address this challenge by:
Avoiding Undefined Behavior: Preventing common pitfalls like null pointer dereferences, data races, or buffer overflows.
Improving Maintainability: Reducing the scattering of unsafe blocks across the codebase makes it easier to audit and debug.
Providing Ease of Use: Enabling most developers to rely on Rust’s safety guarantees without needing to understand the intricacies of the underlying unsafe implementation.
What is a Safe Abstraction?
A safe abstraction is an API or module where the internal implementation may use unsafe code, but the external
interface ensures that incorrect usage is either impossible or extremely difficult.
Let’s look at how to create one.
Example: Safe Wrapping of Unsafe Memory Allocation
Here’s a simplified example of wrapping unsafe memory management into a safe abstraction:
pubstructSafeAllocator{// Internal raw pointer or other unsafe constructsptr:*mutu8,size:usize,}implSafeAllocator{pubfnnew(size:usize)->Self{letptr=unsafe{libc::malloc(size)as*mutu8};ifptr.is_null(){panic!("Failed to allocate memory");}Self{ptr,size}}pubfnallocate(&self,offset:usize,len:usize)->&[u8]{ifoffset+len>self.size{panic!("Out of bounds access");}unsafe{std::slice::from_raw_parts(self.ptr.add(offset),len)}}pubfndeallocate(self){unsafe{libc::free(self.ptras*mutlibc::c_void);}}}implDropforSafeAllocator{fndrop(&mutself){unsafe{libc::free(self.ptras*mutlibc::c_void);}}}
In this example:
unsafe is confined to specific, well-defined sections of the code.
The API ensures that users cannot misuse the allocator (e.g., by accessing out-of-bounds memory).
Drop ensures memory is automatically freed when the allocator goes out of scope.
Example Usage of SafeAllocator
Here’s how you might use the SafeAllocator in practice:
fnmain(){// Create a new SafeAllocator with 1024 bytes of memoryletallocator=SafeAllocator::new(1024);// Allocate a slice of 128 bytes starting from offset 0letslice=allocator.allocate(0,128);println!("Allocated slice of length: {}",slice.len());// The allocator will automatically deallocate memory when it goes out of scope}
This usage demonstrates:
How to create and interact with the SafeAllocator API.
That memory is automatically managed via Rust’s Drop trait, preventing leaks.
Leveraging Rust’s Type System
Rust’s type system is another powerful tool for enforcing invariants. For example, you can use:
Lifetimes: To ensure references don’t outlive the data they point to.
PhantomData: To associate types or lifetimes with otherwise untyped data.
Ownership and Borrowing Rules: To enforce safe access patterns at compile time.
Documentation of Safety Contracts
Any unsafe code should include clear documentation of the invariants it relies on. For example:
// Safety:// - `ptr` must be non-null and point to a valid memory region.// - `len` must not exceed the bounds of the allocated memory.unsafe{std::slice::from_raw_parts(ptr,len)}
This makes it easier for future maintainers to understand and verify the correctness of the code.
Real-World Examples of Safe Abstractions
Many Rust libraries provide excellent examples of safe abstractions over unsafe code:
std::sync::Mutex: Internally uses unsafe for thread synchronization but exposes a safe API for locking and unlocking.
Vec: The Rust standard library’s Vec type uses unsafe for raw memory allocation and resizing but ensures bounds checks and proper memory management externally.
crossbeam: Provides safe concurrency primitives built on low-level atomic operations.
Costs and Benefits
While writing safe abstractions requires extra effort and careful thought, the benefits outweigh the costs:
Benefits:
Reduced Risk of Bugs: Encapsulating unsafe code minimizes the chance of introducing undefined behavior.
Improved Developer Experience: Safe APIs make it easier for others to use your code without worrying about low-level details.
Easier Auditing: With unsafe code isolated, it’s easier to review and verify its correctness.
Costs:
Initial Effort: Designing a robust safe abstraction takes time and expertise.
Performance Overhead: In rare cases, adding safety layers may incur slight overhead (though usually negligible in well-designed abstractions).
Conclusion
Writing safe abstractions for unsafe Rust code is both an art and a science. It involves understanding the invariants
of your unsafe code, leveraging Rust’s type system to enforce safety, and documenting your assumptions clearly. By
doing so, you can harness the power of unsafe while maintaining Rust’s guarantees of memory safety and concurrency
correctness—the best of both worlds.
In today’s post, we’ll build a simple key value server; but we’ll do it in an iterative way. We’ll build it up simple
and then add safety, concurrency, and networking as we go.
Implementation
Now we’ll get started with our iterations. The finished code will be available at the end of this post.
Baseline
All of our implementations will deal with a KeyValueStorestruct. This struct will hold all of the variables that
we want to keep track of in our server.
String is pretty limiting to store as far as the value side is concerned. We can upgrade this to specifically use
data types that we will find useful via an enum:
#[derive(Debug,Clone)]enumValue{String(String),Integer(i64),Float(f64),Boolean(bool),Binary(Vec<u8>),// Add more variants as needed}
We can swap out the value side of our data member now, too.
structKeyValueStore{data:HashMap<String,Value>,}
The implementation simply swaps the String for Value:
We’re now able to not only store strings. We can store integers, floats, binary, and booleans. This makes our key value
store a lot more versatile.
Thread Safety
We will have multiple threads of execution trying to perform actions on this structure at the same time, so we will
add some thread safety to the process now. Wrapping data in Arc will give us a thread safe, reference counting
pointer. We’re also going to need to lock this data structure for reading and for writing. We can use RwLock to
take care of that for us.
We update our data structure to include these new types:
These functions are now safe, which means calling code can be multithreaded and we can guaranteed that our data
structure will be treated consistently.
fnmain(){letstore=Arc::new(KeyValueStore::new());// Create a vector to hold thread handlesletmuthandles=vec![];// Spawn threads to perform insertsforiin0..5{letstore=Arc::clone(&store);lethandle=thread::spawn(move||{letkey=format!("key{}",i);letvalue=Value::Integer(i*10);store.insert(key.clone(),value);println!("Thread {} inserted: {}",i,key);});handles.push(handle);}// Spawn threads to read valuesforiin0..5{letstore=Arc::clone(&store);lethandle=thread::spawn(move||{letkey=format!("key{}",i);ifletSome(value)=store.get(&key){println!("Thread {} read: {} -> {:?}",i,key,value);}else{println!("Thread {} could not find: {}",i,key);}});handles.push(handle);}// Spawn threads to delete keysforiin0..5{letstore=Arc::clone(&store);lethandle=thread::spawn(move||{letkey=format!("key{}",i);store.delete(&key);println!("Thread {} deleted: {}",i,key);});handles.push(handle);}// Wait for all threads to completeforhandleinhandles{handle.join().unwrap();}println!("Final state of the store: {:?}",store.data.read().unwrap());}
Error handling
You can see that we’re using unwrap in the implementation functions, which might be ok for tests or short scripts. If
we’re going to expect to run this code in production, we’d be best replacing these with actual error handling counterparts.
In order to do that, we need to define our error domain first. We create an enum called StoreError. As we fill out
our implementation, we’ll run into a number of different error cases. We’ll use StoreError to centralise all of these
errors so we can express them clearly.
We’ve implemented PoisonError for our StoreError because the PoisonError type is an error which can be returned
whenever a lock is acquired. If something goes wrong and we’ve acquired a lock, it’s a PoisonError that’s used.
Our insert, get, and delete methods now need an upgrade. We’ll be returning Result<T, E> values from our
functions now to accomodate potential failures.
fninsert(&self,key:String,value:Value)->Result<(),StoreError>{letmutlocked=self.data.write()?;locked.insert(key,value);Ok(())}fnget(&self,key:&str)->Result<Option<Value>,StoreError>{letlocked=self.data.read()?;Ok(locked.get(key).cloned())// Clone the value to return an owned copy}fndelete(&self,key:&str)->Result<(),StoreError>{letmutlocked=self.data.write()?;iflocked.remove(key).is_none(){returnErr(StoreError::KeyNotFound(key.to_string()));}Ok(())}
We’ve removed the use of unwrap now, swapping out to using the ? operator. This will allow us to actually handle
any failure that is bubbled out of calling code.
Using the File System
We need to be able to persist the state of our key value store out to disk for durability. In order to do this, we need
to keep track of where we’ll write the file. We add a file_path member to our structure:
Starting out this implementation simply, we just write a load and save function that we can call at any time. Before
we do this we need some extra dependencies added for serialisation:
This will allow us to reduce our internal state to JSON.
Loading the database off disk
/// Load the state from a filefnload(&self)->Result<(),StoreError>{ifletSome(refpath)=self.file_path{matchfs::read_to_string(path){Ok(contents)=>{letdeserialized:HashMap<String,Value>=serde_json::from_str(&contents)?;letmutlocked=self.data.write()?;*locked=deserialized;// Replace the current state with the loaded oneOk(())}Err(e)ife.kind()==ErrorKind::NotFound=>{// File doesn't exist, just return Ok (no data to load)Ok(())}Err(e)=>Err(e.into()),}}else{Err(StoreError::IoError("File path not set".to_string()))}}
We need to make sure that a file_path was specified. We read everything off from the file into contents as a big
string. Using serde_json::from_str we can turn that contents into the deserialised representation. From there, we
simply swap out the underlying content.
We’ve got some new errors to deal with here in IoError.
This will be used for our write implementation which looks like this:
/// Save the current state to a filefnsave(&self)->Result<(),StoreError>{ifletSome(refpath)=self.file_path{letlocked=self.data.read()?;letserialized=serde_json::to_string(&*locked)?;fs::write(path,serialized)?;Ok(())}else{Err(StoreError::IoError("File path not set".to_string()))}}
The magic here really is the serde_json::to_string taking our internal state and writing it as json.
Finally, we’ll add some networking to the solution. A really basic network interface will allow remote clients to
perform the get, set, and delete operations for us.
The handle_client function is the heart of the server process, performing the needed processing on incoming requests
and routing them to the database instance:
fnhandle_client(mutstream:TcpStream,store:Arc<KeyValueStore>){letmutbuffer=[0;512];// Read the incoming requestmatchstream.read(&mutbuffer){Ok(_)=>{letrequest=String::from_utf8_lossy(&buffer);letmutparts=request.trim().split_whitespace();letcommand=parts.next();letresponse=matchcommand{Some("SET")=>{letkey=parts.next().unwrap_or_default().to_string();letvalue=parts.next().unwrap_or_default().to_string();store.insert(key,Value::String(value));"OK\n".to_string()}Some("GET")=>{letkey=parts.next().unwrap_or_default();ifletOk(Some(value))=store.get(key){format!("{:?}\n",value)}else{"Key not found\n".to_string()}}Some("DEL")=>{letkey=parts.next().unwrap_or_default();store.delete(key);"OK\n".to_string()}_=>"Unknown command\n".to_string(),};// Send the response back to the clientstream.write_all(response.as_bytes()).unwrap();}Err(e)=>eprintln!("Failed to read from socket: {}",e),}}
Out networking “protocol” looks like this:
-- set the key "key1" to the value "hello"
SET key1 hello

-- get the value of the key "key1"
GET key1

-- remove the value and key "key1"
DEL key1
We read in the request data from the client into request. This gets split up on white spaces into parts with command
given the first of these parts. The code is expectingcommand to be either SET, GET, or DEL that is then
handled in the following pattern match.
This function gets mounted onto the server in the main function which now looks like this:
fnmain(){letstore=Arc::new(KeyValueStore::new(None));letlistener=TcpListener::bind("127.0.0.1:7878").unwrap();println!("Server running on 127.0.0.1:7878");forstreaminlistener.incoming(){matchstream{Ok(stream)=>{letstore=Arc::clone(&store);std::thread::spawn(move||handle_client(stream,store));}Err(e)=>eprintln!("Connection failed: {}",e),}}}
We’re starting our server on port 7878 and handling each connection with our handle_client function.
Running this and giving it a test with telnet gives us the following:
➜  telnet 127.0.0.1 7878
Trying 127.0.0.1...
Connected to 127.0.0.1.
Escape character is '^]'.
SET key1 hello
OK
Connection closed by foreign host.

➜  telnet 127.0.0.1 7878
Trying 127.0.0.1...
Connected to 127.0.0.1.
Escape character is '^]'.
GET key1
String("hello")
Connection closed by foreign host.

➜  telnet 127.0.0.1 7878
Trying 127.0.0.1...
Connected to 127.0.0.1.
Escape character is '^]'.
DEL key1
OK
Connection closed by foreign host.

➜  telnet 127.0.0.1 7878
Trying 127.0.0.1...
Connected to 127.0.0.1.
Escape character is '^]'.
GET key1
Key not found
Connection closed by foreign host.
So, it works. It’s crude and needs to be patched to be a little more production ready than this - but this is a start.
Conclusion
In this article, we walked through building a thread-safe, persistent key-value store in Rust. We started with a simple
in-memory implementation and iteratively improved it by:
Adding support for multiple data types using an enum.
Ensuring thread safety with RwLock and Arc.
Replacing unwrap with proper error handling.
Adding file persistence using JSON serialization and deserialization.
Added some basic network access
This provides a solid foundation for a more robust and scalable key-value server. Next steps could include:
Implementing advanced features like snapshots or replication.
Optimizing for performance with tools like async I/O or a custom storage engine.
Rust, known for its performance, memory safety, and low-level control, is gaining traction in domains traditionally
dominated by Python, such as machine learning (ML). While Python is the go-to for prototyping ML models due to its
mature ecosystem, Rust shines in scenarios demanding high performance, safety, and seamless system-level integration.
In this post, we’ll explore how to implement logistic regression in Rust and discuss the implications of the model’s
output.
Why use Rust?
Before diving into code, it’s worth asking: why choose Rust for ML when Python’s libraries like TensorFlow and PyTorch
exist?
Benefits of Rust:
Performance: Rust offers near-C speeds, making it ideal for performance-critical tasks.
Memory Safety: Its ownership model ensures memory safety, preventing bugs like segmentation faults and data races.
Integration: Rust can easily integrate with low-level systems, making it a great choice for embedding ML models into IoT, edge devices, or game engines.
Control: Rust provides fine-grained control over execution, allowing developers to optimize their models at a deeper level.
While Rust’s ML ecosystem is still evolving, libraries like ndarray, linfa, and smartcore provide foundational
tools for implementing machine learning models.
Logistic Regression
Logistic regression is a simple yet powerful algorithm for binary classification. It predicts whether a data point
belongs to class 0 or 1 based on a weighted sum of features passed through a sigmoid function.
Below is a Rust implementation of logistic regression using the ndarray crate for numerical operations.
usendarray::{Array2,Array1};usendarray_rand::RandomExt;usendarray_rand::rand_distr::Uniform;fnsigmoid(x:f64)->f64{1.0/(1.0+(-x).exp())}fnlogistic_regression(X:&Array2<f64>,y:&Array1<f64>,learning_rate:f64,epochs:usize)->Array1<f64>{let(n_samples,n_features)=X.dim();letmutweights=Array1::<f64>::random(n_features,Uniform::new(-0.01,0.01));letmutbias=0.0;for_in0..epochs{letlinear_model=X.dot(&weights)+bias;letpredictions=linear_model.mapv(sigmoid);// Compute the errorleterror=&predictions-y;// Compute gradientsletgradient_weights=X.t().dot(&error)/n_samplesasf64;letgradient_bias=error.sum()/n_samplesasf64;// Update weights and biasweights-=&(learning_rate*gradient_weights);bias-=learning_rate*gradient_bias;}weights}fnmain(){letX=Array2::random((100,2),Uniform::new(-1.0,1.0));// Random featureslety=Array1::random(100,Uniform::new(0.0,1.0)).mapv(|v|ifv>0.5{1.0}else{0.0});// Random labelsletweights=logistic_regression(&X,&y,0.01,1000);println!("Trained Weights: {:?}",weights);}
Key Concepts:
Sigmoid Function: Converts the linear combination of inputs into a value between 0 and 1.
Gradient Descent: Updates weights and bias iteratively to minimize the error between predictions and actual labels.
Random Initialization: Weights start with small random values and are fine-tuned during training.
Output
When you run the code, you’ll see output similar to this:
Predictions close to 1 indicate class 1, while predictions close to 0 indicate class 0.
Why Does This Matter?
This simple implementation demonstrates the flexibility and control Rust provides for machine learning tasks. While
Python excels in rapid prototyping, Rust’s performance and safety make it ideal for deploying models in production,
especially in resource-constrained or latency-critical environments.
When Should You Use Rust for ML?
Rust is a great choice if:
Performance is critical: For example, in real-time systems or embedded devices.
Memory safety is a priority: Rust eliminates common bugs like memory leaks.
Integration with system-level components is needed: Rust can seamlessly work in environments where Python may not be ideal.
Custom ML Implementations: You want more control over how the algorithms are built and optimized.
For research or quick prototyping, Python remains the best choice due to its rich ecosystem and community. However,
for production-grade systems, Rust’s strengths make it a compelling alternative.
Conclusion
While Rust’s machine learning ecosystem is still maturing, it’s already capable of handling fundamental ML tasks like
logistic regression. By combining performance, safety, and control, Rust offers a unique proposition for ML developers
building high-performance or production-critical applications.