Today’s post will just be a walk through of the steps required to install Hadoop 2 on Debian Linux. Please note that this is for a single node installation only. This guide is heavily based on the Ubuntu instructions found here.
Install Java
# install the java jdk$ sudo apt-get install openjdk-7-jdk
# make a jdk symlink$ cd /usr/lib/jvm
$ ln-s java-7-openjdk-amd64 jdk
# make sure that ssh server is installed$ sudo apt-get install openssh-server
Add Hadoop Users and Groups
# create a new group for hadoop$ sudo addgroup hadoop
# create the hduser and put them in the hadoop group$ sudo adduser --ingroup hadoop hduser
# add them to the sudo group also$ sudo adduser hduser sudo
Now login as “hduser”.
SSH Certificates
# generate your key$ ssh-keygen -t rsa -P''# set your public key as authorized$ cat ~/.ssh/id_rsa.pub >> ~/.ssh/authorized_keys
# test out ssh$ ssh localhost
Download Hadoop
# downoad the package$ cd ~
$ wget http://mirror.rackcentral.com.au/apache/hadoop/common/hadoop-2.2.0/hadoop-2.2.0.tar.gz
# extract the package$ sudo tar vxzf hadoop-2.2.0.tar.gz -C /usr/local
$ cd /usr/local
$ sudo mv hadoop-2.2.0 hadoop
# get the hduser to take ownership$ sudo chown-R hduser:hadoop hadoop
Lua is a programming language that has seen increased popularity from the game development industry. It’s put to use in the disciplines of providing configuration data all the way through to scripting automated character actions.
In today’s post, I’ll walk you through the setup process of the libraries up to writing your first testing application within a Linux environment.
Library Installation
Before you get downloading and building this library, you’ll just need to ensure that you have a build environment installed and are able to compile.
At the time of writing this article, the Lua website had 5.2.3 as their latest release. From their downloads page, grab the latest tar.gz archive and extract it onto your machine. Following along with their building instructions, issuing “make linux test” whilst in the extracted folder did the trick. It built Lua ready for me to use. A nice convenience of the make file was the “make local” option. Upon issuing this request, the make system will prepare an installation folder that is suitable for you to use locally (i.e. not installed to the system).
When it comes to downloading the latest versions of libraries, I’ll rarely install these to my system. Rather, I drag them around for each project that needs them so that the project determines its dependencies as opposed to my system.
From here, I prepare a distributable directory of development files that I know that each of my project needs. In the case of Lua, I create the following structure:
I have all of the development headers available (under the “include” folder) and a static version of the Lua library (under lib).
Building applications
When building Lua applications, you’ll need to specify the libraries and include folders to your compiler so it knows where to find them. For a test application that I’d written, the following command line compiled an application for me without any trouble.
You can see at the end there, mention of both the “lua” and “dl” libraries.
Test application
A very simple test to start will be creating a program that will execute a Lua script, pull out on of its global variables and display it to screen.
Here’s our Lua script:
x=10
Pretty simple. We have one variable x set to 10. Now here’s the C++ code that we use to read that one variable out and present it to screen.
#include<iostream>
#include<lua.hpp>intmain(intargc,char*argv[]){// create a new lua context to work withlua_State*L=luaL_newstate();// open any library we may useluaL_openlibs(L);// read the Lua script off disk and execute itif((luaL_dofile(L,"test.lua"))!=0){// handle any errors std::cout<<"unable to load test.lua"<<std::endl;return1;}// put the value of X at the top of the stacklua_getglobal(L,"x");// interpret the value at the top of the stack // as an integer and put it in the variable "val"intval=(int)lua_tointeger(L,-1);// pop the value of X off the stacklua_pop(L,1);// write the value outstd::cout<<"Value of X: "<<val<<std::endl;// finish up with the Lua contextlua_close(L);return0;}
I think that the source code above (paired with the documentation on the Lua website) should make things pretty straight forward.
That’s it for today. This is only scratching the surface on what Lua can do. For my purposes right now, I just need to feed configuration values into programs, this fits the purpose really well.
SDL2 was released a little while ago, but still hasn’t made it into the stable repositories of some Linux distributions. After doing a big of digging, it’s not too hard to get this installed yourself - most of the advice offered in this post comes from an answer on the Ubuntu forums here.
In today’s post, we’ll install SDL2 on a Debian/Ubuntu style distribution from source.
Dependencies
First thing before we download and compile the SDL2 source is to get some of the dependencies installed on your system. The following install line will put all of the libraries that SDL2 requires:
Once all of these have installed successfully, you’ll need to download a copy of the source. All downloads can be found here. This guide will assume that you’ll download the .tar.gz source archive.
Compilation and Installation
Extract the package into a directory under your home directory, somewhere . . .
$ tar-xzf SDL2-*.tar.gz
$ cd SDL2-*
Next we’ll configure, build and install the libraries.
$ ./configure
$ make
$ sudo make install
Once compilation and installation have complete, you’ll need to update your library links/cache. Do this with the following command:
Noise functions in computer applications allow programmers to make the machine act a little more naturally. It’s the randomness introduced with these algorithms that gives the computer what appears to be “free thought” or unexpected decisions.
Today, I’ll walk through the Perlin Noise algorithm which has applications in computer science ranging from player movement, landscape generation, clouds, etc.
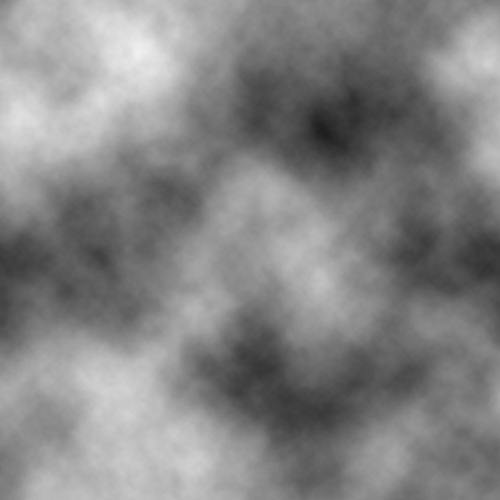
Here are some examples of the Perlin Noise function output into two dimensions:
In today’s post, I’ll walk through the Perlin Noise algorithm and what steps you need to take to implement it yourself.
Understanding Noise
The Perlin Noise algorithm can be broken down into a few smaller pieces to make it easier to understand. At its heart, the algorithm needs pseudo-random numbers. These random numbers should be repeatable so that you can re-generate the same noise pattern at will.
A common noise function for two parameters that I have found used over the web is as follows:
There’s a lot of math transformation in this previous function. You can use any function at all to produce your random numbers, just make sure that you can generate them against two parameters (in the case of 2d) and that you’ll get repeatable results.
Next we’ll smooth out the noise between two points. We’ll do this by sampling the corners, sides and centre of the point we’re currently generating for.
floatsmoothNoise(constfloatx,constfloaty){intix=(int)x;intiy=(int)y;// sample the cornersfloatcorners=(noise(ix-1,iy-1)+noise(ix+1,iy-1)+noise(ix-1,iy+1)+noise(ix+1,iy+1))/16;// sample the sidesfloatsides=(noise(ix-1,iy)+noise(ix+1,iy)+noise(ix,iy-1)+noise(ix,iy+1))/8;// sample the centrefloatcentre=noise(ix,iy);// send out the accumulated resultreturncorners+sides+centre;}
With the above function, we can now sample a small area for a given point. All based on our random number generator.
For the fractional parts that occur between solid boundaries, we’ll use a specific interpolation method. I’ve defined two below. One that will do linear interpolation and one that will use cosine for a smoother transition between points.
/* Linear interpolation */floatlerp(floata,floatb,floatx){returna*(1-x)+b*x;}/* Trigonometric interpolation */floatterp(floata,floatb,floatx){floatft=x*3.1415927f;floatf=(1-cosf(ft))*0.5f;returna*(1-f)+b*f;}/* Noise interpolation */floatinterpolateNoise(constfloatx,constfloaty){intix=(int)x;floatfx=x-ix;intiy=(int)y;floatfy=y-iy;floatv1=smoothNoise(ix,iy),v2=smoothNoise(ix+1,iy),v3=smoothNoise(ix,iy+1),v4=smoothNoise(ix+1,iy+1);floati1=terp(v1,v2,fx),i2=terp(v3,v4,fx);returnterp(i1,i2,fy);}
Finally we use this smooth interpolation to perform the perlin noise function. A couple of interesting co-effecients that are provided to the algorithm are “octaves” and “persistence”. “octaves” defines how many iterations that will be performed and “persistence” defines how much of the spectrum we’ll utilise. It’s highly interactive to the main curve co-effecients: frequency and amplitude.
In a previous post I’d written about a simple camera implementation that you can use in projects of your own. This post I’ll show how I’ve implemented this camera with some mouse handling routines to make it feel like you’re orienting your head with the mouse.
The Idea
We’ll capture all of the mouse movements given in an application and see how far the mouse deviates from a given origin point. I think that the most sane origin point to go from is the center of your window. For each movement that the mouse makes from the center of the window, we need to:
Determine how much movement occurred on the x axis
Determine how much movement occurred on the y axis
Deaden this movement by a co-efficient to simulate mouse “sensitivity”
Set the yaw and pitch (head up/down, left/right) of the camera
Reset the mouse back to the origin point
Here’s how I’ve done it in code:
voidmouseMotion(intx,inty){// calculate the origin point (shifting right divides by two, remember!)inthalfWidth=windowWidth>>1;inthalfHeight=windowHeight>>1;// calculate how far we deviated from the origin point and deaden this// by a factor of 20floatdeltaX=(halfWidth-x)/20.0f;floatdeltaY=(halfHeight-y)/20.0f;// don't do anything if there wasn't any movement to reportif((deltaX==0.0f)&&(deltaY==0.0f)){return;}// set the camera's orientationcam.yaw(deltaX);cam.pitch(deltaY);// reset the mouse pointer back to the origin pointglutWarpPointer(halfWidth,halfHeight);}
You can see that I’m using GLUT to do these demos. The only GLUT-specific piece of code here is the warp command which puts the mouse back onto the origin point. You should have an equivalent function to do the same in the framework of your choice.
Well, there you have it. You can now orient your camera using your mouse.